Businesses from every industry use SFTP/FTPS servers and Amazon S3 cloud storage, or non-Amazon S3 compatible storage, on a regular basis to share information. As companies strive to connect multiple applications and processes, IT teams run into issues when they need to automate file transfers between servers and storage locations. This connectivity requirement is challenging and difficult since many IT teams are still using point-to-point integration methods (including manually coding custom scripts) to connect endpoints.
Instead, efficiently automate file transfers between SFTP/FTPS and Amazon S3 or non-Amazon S3 compatible storage using our cloud-native managed file transfer (MFT) service. Thru is an enterprise-grade solution that enables companies to schedule, track and control file exchanges across any number of endpoints with both internal and external organizations. Businesses can connect Thru to file transfer integration platforms (iPaaS) such as MuleSoft and Boomi to quickly plug in file workflows to various applications and systems.
Key Concepts of Thru’s Automated File Transfer Service
Thru is built on three primary components:
Organizations represent businesses, departments, teams, etc. that exchange files with each other.
Flows represent pathways, or processes, created to transfer files between endpoints. Organizations subscribe to flows to participate in them. The flow determines the behavior of file transfers between organizations.
Endpoints represent origin(s) and/or destination(s) of file transfers, referred to as Source and Target flow endpoints within Thru. For example, a flow endpoint could be an SFTP server, an FTPS server or an iPaaS connector.

How to Automatically Transfer Files to Amazon S3
Using our web-based interface, easily set up a workflow to automate file transfers from an SFTP server to Amazon S3 storage. You’ll need the credentials for your SFTP server and Amazon S3 storage to create the workflow.
Sign in to your Thru portal to get started. Don’t have a Thru account? Sign up for a 30-day free trial »
The following steps highlight how to create a flow to automatically transfer files from an SFTP server to Amazon S3, or non-Amazon S3 compatible, storage. Below are notes and links to bookmarks in our detailed getting started tutorial video, however, please note that the demo does not show the same endpoint types as needed for this example. Refer to our online user guide for additional information.
Step 1 – Create Organization
Demo: [0:15] Get Started: Add Organization »
When creating the organization, you can create separate organizations for each endpoint or add both endpoints to the same organization.
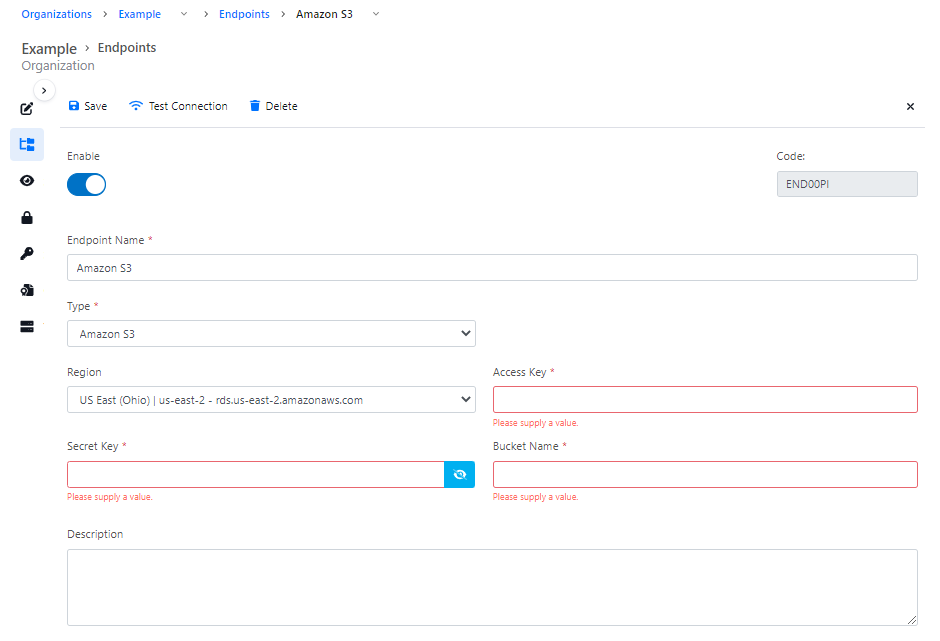
Step 2 – Add SFTP Server and Amazon S3 Endpoints
Endpoints are added on the organization(s) that you just created. When adding endpoints, you will need to select different endpoint types than what are shown in the demo:
- External SFTP
- Amazon S3
From the Type dropdown menu, select the type of endpoint where your files are currently stored. Since your own SFTP server (and not Thru as an SFTP server) is used for this exercise, select External SFTP. Complete the credentials for the SFTP server.
Note: For non-Amazon S3 compatible storage, select Amazon S3 in the Type dropdown and then select Non-Amazon | S3-compatible – Enter your S3 Service URL from the Region dropdown.
Step 3 – Create the Flow to Transfer Files from SFTP to Amazon S3
Demo: [1:25] Create Flow »
Go to the Flows page to add the flow.
Step 4 – Subscribe Organization to Flow
Demo: [1:36] Subscribe Organization to Flow »
If you created more than one organization, be sure you subscribe both to the same flow.
Step 5 – Configure Flow
Once the organization(s) is subscribed, all of its endpoints are available to the flow. Now go to Flow Studio to continue setup and configuration of the flow and its flow endpoints.
Add Flow Endpoints
Demo: [1:54] Add Endpoints to Flow »
- In the Sources (light blue) box, select your organization from the dropdown menu and then check the box of the External SFTP endpoint. Click Add Flow Endpoint.
- In the Targets (light green) box, select Amazon S3 on your organization. Click Add Flow Endpoint.
Add Filepaths
Demo: [2:40] Configure Filepaths for Source and Target »
Now that the endpoints are added to the flow, it is time to configure the filepath for each source and target flow endpoint. To configure and define its actions, access the Flow Endpoint Editor for each endpoint:
- In the Endpoint Source Path section of the Sources box, type the filepath of where the files are located on the SFTP server. Be sure to save your changes.
- In the Targets box, type the filepath on the Amazon S3 storage of where you want the files delivered. Be sure to save your changes.
Although several settings and options can be selected for execution by each endpoint, such as scheduling, renaming, etc., to keep this example simple, we are only adding the filepaths. Additional configuration of the flow endpoints can be done at any time without breaking or affecting other file transfer processes using this flow.
Check Mapping in Mapping Tab of Target Flow Endpoint
Demo: [4:27] Check Endpoint Mapping »
To ensure the mapping of the flow endpoints is correct, open the Flow Endpoint Editor of the Targets box and access the Mapping tab. If the mapping is incorrect or incomplete, use the pulldown options to select the Source Endpoint and its corresponding source and target filepaths.
Step 6 – Send Files to Amazon S3 and View Activity
Check and then Push Changes
Demo: [5:06] View and Push Changes »
It’s important to review the additions and changes that you made to a flow prior to pushing it live. Changes will take effect immediately and your flow is ready for use.
Test Your File Transfer Flow
Demo: [5:32] Upload File to Test Flow »
Use Thru’s File Upload interface to easily upload a file to the Source Flow Endpoint to test your flow.
Check if Your File Reached Its Destination
Demo: [6:15] View Activity »
Did your file successfully get delivered? It’s easy to check. Go to the Activity page and see file activity within the Thru web-based portal.

Thru also exposes multiple APIs to access the service. Our comprehensive APIs can be used by an authenticated client to seamlessly integrate our file transfer service with existing applications or integration platforms. Customers can then use their own interface for configuration, management, monitoring and alerts of their file transfers.
Automate SFTP to Amazon S3 File Transfers Using MFT
Managed file transfer solutions can be used to automatically process files, guarantee file delivery and alert administrators when issues arise. Thru’s cloud-native MFT service is based on a publish-subscribe (pub/sub) design which uses workflow subscriptions to replace multiple, brittle point-to-point connections, making it more flexible and easier to use than traditional MFT solutions.
Go to our automated file transfer page to learn more or schedule time with our experts who can answer your questions about automating file transfers and Thru.
[Note: This blog was originally posted on Aug 23, 2017, and has been updated to demonstrate the latest Thru features]